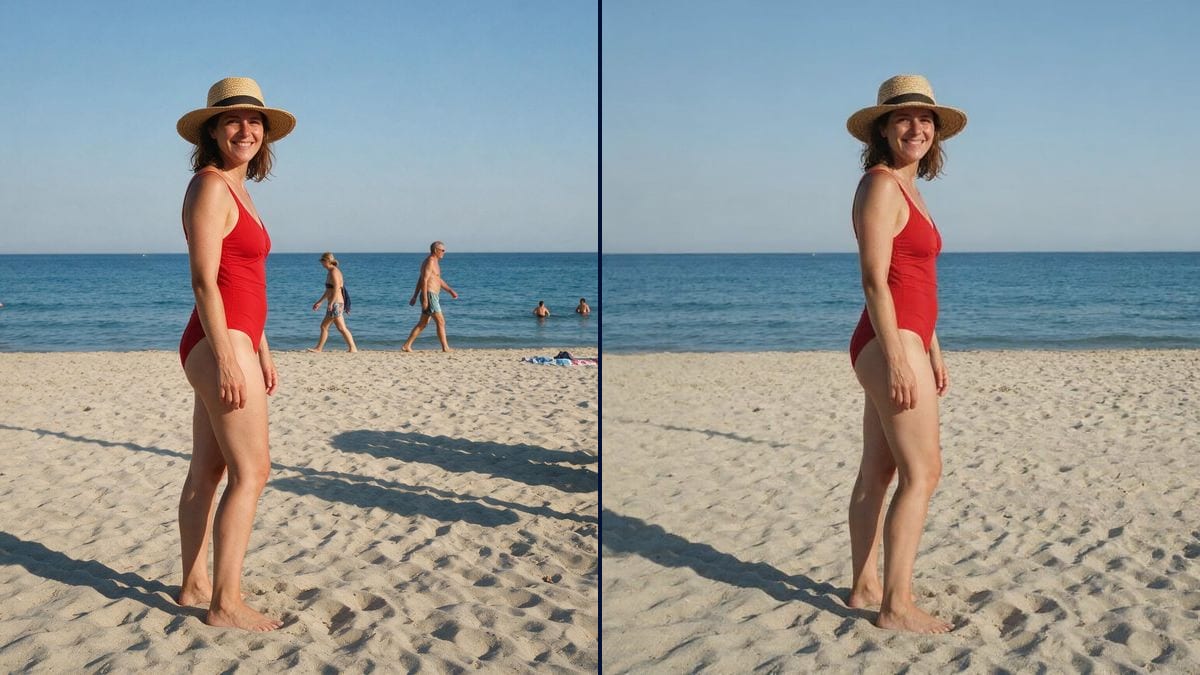
The background figures disappear, then the fixed object spoiling the frame, and the scene closes behind them with no blurred patch. The full workflow, no account needed.
The real workflow: the walkers in the background go first, the bin next, and the sand and the horizon line continue behind them.
At a glance
What the workflow produces
2 images in 4:3
Canvas structure
6 nodes wired by 4 connections
Models wired in
Flux Kontext
Cost of one full run
about 12 credits, roughly $0.14
Two passes chained on the same photo, because you do not remove everything at once. The first erases the figures in the background, the second the fixed object spoiling the frame: a bin, a sign, a cable, a car. Asking for both in one instruction gives a mediocre result on both.
What separates this from a classic retouching tool comes down to one sentence in the instruction: it always says what lies BEHIND what you remove. Continue the sand, extend the horizon line, close the wall back up. Without that sentence, the model plugs the hole with a blurred patch, and the blur in that spot shows more than the intruder you were erasing.
Flux Kontext is an editing model: it retouches your photo instead of generating a new one. The rest of the frame, the colours, the grain and the light do not move, which is the only way to end up with an image that still holds. The two passes cost fourteen cents.
How it works
1
Import the photo
A holiday photo, a product photo, a listing photo: the source does not matter. The Media node takes a phone shot, what counts is how sharp the area to treat is.
2
Remove the people first
The first instruction targets the figures in the background, the ones who happened to be passing. Describe what should reappear in their place: the sand, the water, the crowd further off, the wall.
3
Then remove the object
The second node starts from the first pass. Name the object precisely, its position in the frame, and what its disappearance should reveal.
4
Look at the area closely
Zoom in on the erased spot. A repeating texture, a line that breaks or a local blur mean the instruction did not describe the background well enough. Regenerating costs a few cents.
Variations and use cases
The same canvas, tuned for different needs: each variation is two or three lines of prompt away.
Removing a photobomber from a holiday photo
The most common case: the walker crossing the frame at the moment of the shot. The instruction describes the sand, the water or the crowd further off, and the scene closes behind them without leaving a patch.
Cleaning up a listing photo
A bin in front of the facade, a building sign, a car parked there by chance. None of these tell the buyer anything about the property and they spoil the shot. Careful not to cross the line: a flaw in the property itself stays, see decluttering.
Erasing a cable, a wire, a socket
Thin objects are what classic tools miss most: they leave a trace where the cable ran. Here the instruction describes the surface crossed, wall or ceiling, and the model rebuilds it instead of smoothing it.
Removing a third-party logo or brand
Useful before publishing a photo where a brand appears by accident. The model replaces it with the material of the support, fabric, cardboard or metal. This is not permission: erasing a logo grants no rights over what remains visible.
A product photo taken in a hurry
An object sitting on a cluttered table sells badly. Two passes are often enough to isolate the product without a studio. For a real backdrop, the background swap workflow goes further.
Removing a reflection or an unwanted shadow
A reflection in a window or the photographer's own shadow are treated like an object, as long as you describe what the area should show instead. It is a harder case than the others, because the surface concerned is often structured.
Common mistakes
Not describing the background
The mistake that produces the blurred patch. Remove the bin leaves the model guessing; remove the bin and continue the brick wall and the pavement behind it gives it material to rebuild. That is the whole difference.
Asking for everything in one instruction
An Image node handles one intention. An instruction listing the people, the bin, the sign and the cable gives a mediocre result everywhere. Two or three chained nodes cost the same and give a clean result.
Erasing a subject that is too large
A figure in the foreground hides part of the scene that nothing lets you guess. The model invents, and the invention shows. On a structured background, cropping beats erasing.
Hiding a flaw instead of an intruder
Removing a bin in front of a facade is honest, erasing a crack on that facade is not. The workflow does not tell the difference, you have to, and the listing comes back on whoever published it.
Because an Image node handles one intention at a time. Remove the people and the bin gives an approximate result on both, whereas two separate instructions let you describe each background precisely, and regenerate only one of them if needed.
Does it leave a blurred patch?
That is the classic flaw of erasing tools, and it comes from the instruction, not the model. As soon as you describe what lies behind, the model rebuilds the material instead of smoothing it. That is the sentence never to remove.
Can I remove a person in the foreground?
That is the hardest case: a close figure covers a large area and hides part of the scene that nothing lets you guess. The result is good when the background is regular, sand, wall, sky, and risky when it is structured.
What do the two passes cost?
Fourteen cents. The price shows on each node before you click, which lets you regenerate a difficult area several times without thinking about it.
How is this different from a classic retouching tool?
A clone stamp copies neighbouring pixels and shows as soon as the area is textured. Here an editing model rebuilds what should be there, from what you describe. The result depends on the care put into the description.
Can I remove a person from a group photo?
Technically yes, if they are not touching the others. An arm passing in front of a neighbour forces the model to rebuild that neighbour, and that is where the render gets risky.
Does the rest of the photo move?
No, that is the point of an editing model: the colours, the grain, the light and the framing stay those of your photo. Compare with the original left next to it on the canvas, any drift shows immediately.
Does it work on video?
Not with this workflow, which handles a still image. A video would need the same correction on every frame and consistency between them, which is a different problem.