Painting the tiles
The cheapest renovation there is, and the one people doubt the most before doing it. The demo's first render shows what painted white tiles with fresh grout really look like, floral border included.
A photo of your bathroom goes into three Image nodes that each rework it on a different budget: refresh without breaking anything, rebuild it light, rebuild it dark. The full workflow is visible here, no account needed.
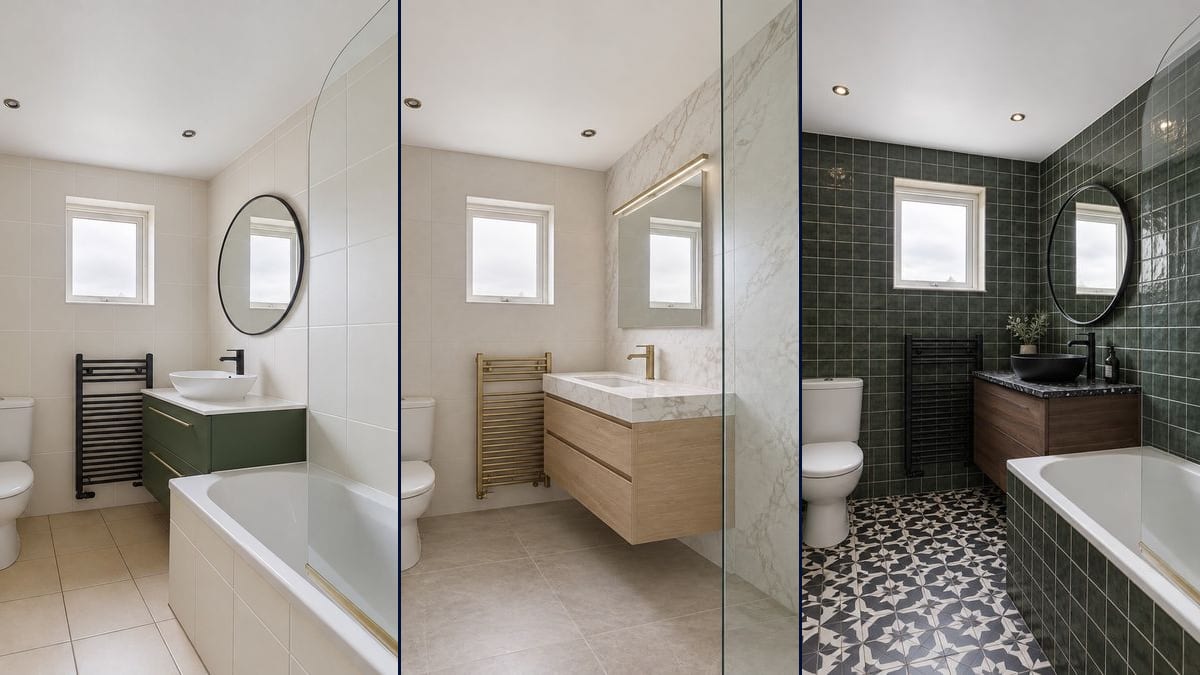
The real workflow: the photo of the starting bathroom wired to three GPT Image 2.5 Sunburst nodes, one instruction per budget. The three renders are the demo's own, taken from the doorway.
At a glance
A bathroom gets redone once every twenty years, and the decision is made over a ten centimetre tile sample held against a showroom unit. This workflow takes it in pictures: the photo of your current room goes into three nodes that each rework it at a different level of spend, and the three renders come out from the doorway, in the same light, with the bath and the toilet in the same place.
The first project breaks nothing: the tiles are painted, the grout redone, the vanity unit repainted green, the taps swapped for black ones. The second rips everything out and rebuilds the room in off-white, marble and brass, with a shower where the bath was. The third rebuilds it in dark green zellige, walnut and terrazzo. Three quotes, three images.
A bathroom is harder than the kitchen: everything is tiled from floor to ceiling, and a model that keeps the tiles has done nothing. So the workflow runs on GPT Image 2.5 Sunburst, measured as the only model in the catalogue that really strips the surfaces instead of repainting them. The three renders cost nine credits.
These are the files of the workflow above, exactly as the models produced them, unretouched. The starting point is shown when there is one.
Starting point
Render
Homeowners comparing budgets, and tradespeople who want to show three options on the real room.
Shoot from the doorway
Hold the phone straight, at chest height, and frame the whole room with the bath and the vanity unit in shot. This photo is the base for all three projects.
Watch out for the mirror
A mirror sends back the photographer, an open door or a light left on, and the model copies that reflection into all three renders. Step aside, or close the door behind you.
Keep the list of locks
The window, the ceiling height, the bath, the vanity unit, the toilet, the towel rail, the viewpoint and above all the exposure. That paragraph is what makes the three images comparable.
Generate all three, then refine
"Generate all" produces the three projects. Then you change a tile shade or a material in a single instruction and rerun that node: the other two keep their render.
The same canvas, tuned for different needs: each variation is two or three lines of prompt away.
The cheapest renovation there is, and the one people doubt the most before doing it. The demo's first render shows what painted white tiles with fresh grout really look like, floral border included.
Off-white, marble, brass, pale oak, walk in shower. It is the most expensive of the three projects, and the one that changes the perceived value of the room the most in listing photos.
Dark green zellige, walnut, black terrazzo, patterned cement floor tiles. The render shows in one image what a sample never shows: what the colour does to a room tiled from floor to ceiling.
The question comes up in almost every renovation, and it is settled better in front of an image than a plan. The demo's second project puts the shower in the exact place of the bath.
Duplicate a node, change the format and the shade in the instruction, rerun. Two renders of the same room are worth more than two samples held at arm's length under a showroom strip light.
The method works for any small tiled room: shoot from the doorway, lock what does not move, describe three levels of spend. For a room that needs furnishing, furnish an empty room is a better fit.
The reflection of the phone ends up in all three renders, sometimes distorted into an unknown object. Step aside, or shoot from the corner opposite the mirror.
Toothbrushes, bottles, a towel left out: whatever is in the photo comes back renovated in all three images. Two minutes of tidying beats retouching afterwards.
The model turns the room off at the same time as it darkens the walls, and you hand over an image where nothing is visible any more. The instruction has to say the room stays as bright as it started.
Neither the waste pipes, nor the wiring, nor the ventilation, nor the regulations are checked. A render is for choosing a direction before calling a tradesman, not for ordering the work.
It can
It cannot
No. Moving a shower or a toilet depends on where the waste pipes run, and the photo does not show them. The workflow keeps every fitting where it is, which is exactly the constraint of a real renovation.
That is what the demo's second project does, in the exact place of the bath. A model will not tell you whether the fall of the waste allows it: that question goes to the plumber, the image is there to tell you whether you want it.
Because the model dims the light at the same time as it darkens the materials. The dark project's instruction locks the exposure: the room must stay as bright as it started, whatever the colour of the zellige.
Nine credits for the three projects, three per render. The price shows on each node before you generate, and redoing a single project costs only that one.
No, a phone is enough. What matters is a straight frame from the doorway, a tidy room and the light on if the window is small, which it often is in a bathroom.
Turn everything on and shoot anyway. The lock talks about the existing light, whatever it is: the render will keep the artificial lighting rather than invent a window.
That is the best use, and it heads off half the misunderstandings about a quote. Make clear it is a simulation: the survey, the waste pipes and the costing remain their job.
To show renovation potential, yes, as long as you say so clearly. To show the room as it is, renovate a room in a photo is the sheet to use.
Renovate your bathroom with AI: three projects, one photo
Use this workflowFree account, no card required. The workflow opens pre-filled in your canvas.
 GPT Image 2.5 Sunburst
 Flux Kontext
 Nano Banana Pro
 Seedream 5 Pro