Before ordering contacts
She can't choose between three shades on a website. She tries them on her own portrait, sees the grey-blue suits her better than the green, and orders one box instead of three.
Your portrait with hazel green irises, then grey-blue, like coloured contacts, leaving the rest alone. To see the result before you order. Workflow visible here, no account needed.
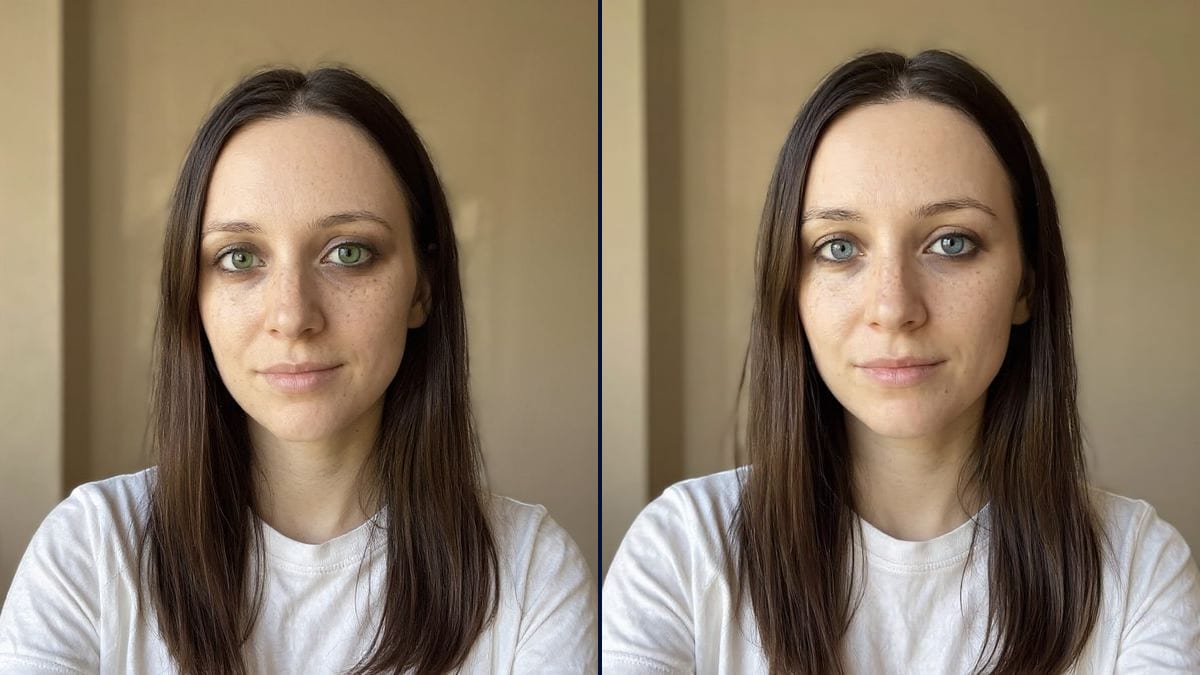
Real workflow: a portrait of a brown-eyed woman with long dark hair in a white T-shirt, then the same woman with hazel green irises and with grey-blue irises. The face stays close, with slightly darker eye contours on the green.
At a glance
Coloured contacts are often bought blind, from photos of someone else's eyes. And the same green looks completely different over light brown than over dark brown. This workflow starts from YOUR portrait and shows two colours, a hazel green and a grey-blue.
The hard part is touching only the iris. Recoloured by hand, the eye goes flat and fake; left alone, a model redraws the gaze too. Flux Kontext changes a small area, and the prompt asks for the original texture and reflections. The demo also shows its limits, covered below.
To go further, try makeup or glasses. Both colours cost twelve credits.
These are the files of the workflow above, exactly as the models produced them, unretouched. The starting point is shown when there is one.
Starting point
Render
People weighing coloured contacts before buying, cosplayers, makeup artists and opticians.
A sharp front-facing portrait with eyes wide open, and the iris colour described with its shade and rim.
Take a sharp portrait
Front-facing, eyes wide open, daylight, no glasses. The bigger the iris in the frame, the finer the result.
Name the colour
Hazel green, light green, grey-blue, steel grey, amber: add "natural, not saturated" and the colour of the rim. One node per colour.
Keep the details
Write down what must stay: freckles, lashes, eyelid shape. The model tends to smooth things over.
Compare with the photo
Put each render next to the original, large, and check that only the iris changed.
The same canvas, tuned for different needs: each variation is two or three lines of prompt away.
She can't choose between three shades on a website. She tries them on her own portrait, sees the grey-blue suits her better than the green, and orders one box instead of three.
For a themed shoot, the makeup artist suggests lenses. He shows the model two colours on her own face before buying the pair that goes with the makeup.
The character has green eyes; hers are brown. A try-on on her photo tells her whether a light green is enough or she needs a bolder shade for the convention.
Grandad had blue eyes and nobody else in the family does. For fun, she shows herself with his eye colour, and the picture goes round the whole family chat.
In the shop, the optician shows a customer two lens shades on her own photo before the trial. She comes to the fitting already knowing which colour she wants.
The script describes pale eyes. The actor and the production see the effect of grey-blue lenses on his face before adding them to the character's costume.
Without "natural, not saturated", the green comes out garish: that's what happened on our first try for the demo. Give the shade, the intensity and the colour of the iris edge.
The lenses catch the light and the model sometimes recolours the reflections. Take them off for the photo.
The model smooths skin as it goes. If your freckles are part of your face, put them in the prompt.
If the iris is a few pixels wide, the model paints it a flat colour. Frame the face large enough for the texture to show.
It stays close. In the demo, the area around the eyes is slightly darker on the green, and on the grey-blue the freckles are softer and the expression a bit more serious: always compare with the photo.
Yes, once we asked for a soft, unsaturated hazel green: it passes for a subtle real lens. With "light green" alone, the first try came out far too garish.
No. Contacts, even plano coloured ones, should be fitted by a professional. The picture only helps you pick a shade.
Twelve credits, six per render on Flux Kontext. A third colour on the same photo costs six more.
Because it edits a small area without rebuilding the image. It isn't perfect: in the demo it slightly darkened the eye area on the green and smoothed the skin on the grey-blue. A model that redraws everything would have changed far more.
Yes: ask for one colour for the left eye and another for the right, and make clear it's the person's left and right.
Yes, but a very pale blue over a near-black iris quickly looks artificial, just like real lenses. Mid shades work better.
The format of your photo, here 3:4, a vertical phone portrait.
Change your eye colour in a photo with AI
Use this workflowFree account, no card required. The workflow opens pre-filled in your canvas.
 Flux Kontext
 Nano Banana 2.1
 GPT Image 2.5 Sunburst