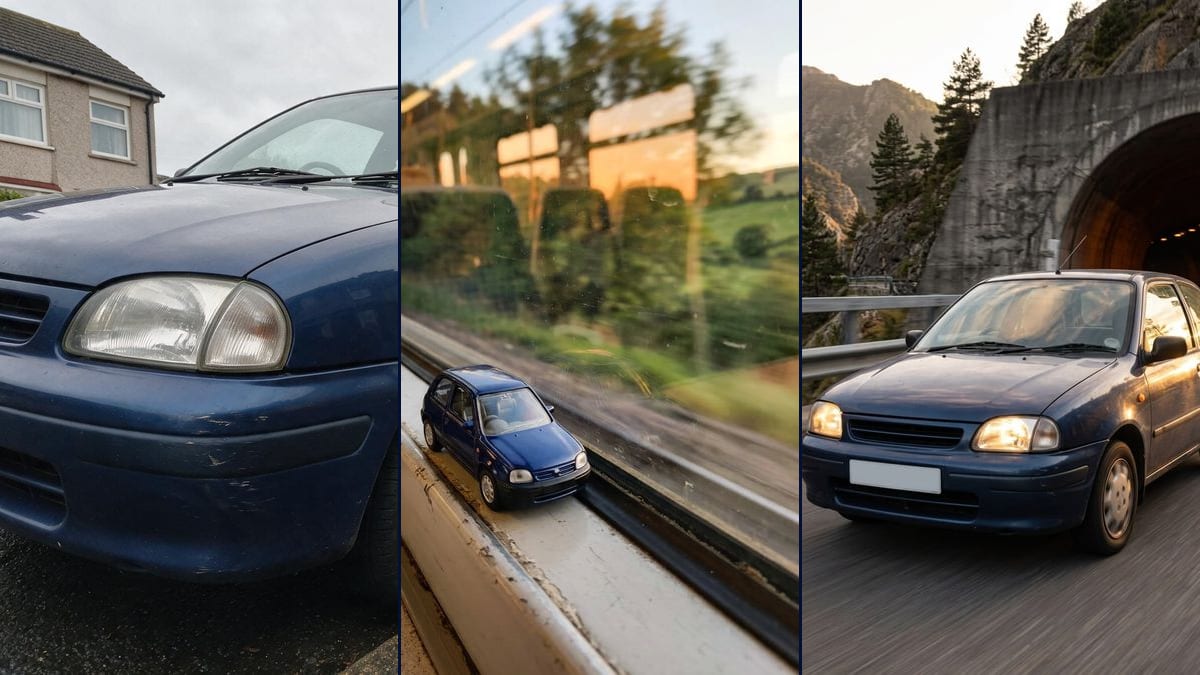
The toy on its own
Run only the train node for 7 credits if all you want is the little car on its ledge, as a profile picture or a card to send the car's owner. The tunnel exit is only there for the transition.
A photo of your car as a small toy model on a train window ledge, then as the real car driving out of a tunnel: the two key frames of the transition. Drift shown. Workflow visible here.
Real workflow: a small dark blue city car parked along a wet kerb, then the same car as a toy model on a train window ledge at sunset, and full size, headlights on, at the exit of a mountain tunnel. The toy comes out newer than the real car, with a small oval on the grille. The plate in the second render is blank white on purpose.
At a glance
A small car on a train window ledge, a tunnel, and on the other side the real car driving out. The "Toy Car to Real Car" transition has existed as a classic edit since 2023, and one like it did the rounds on TikTok in late May 2026. The train window version dates from 19 October 2026: a Turkish video editor posts his reel, and the first copies land on TikTok the next day. We have those dates from a single source, a makeviral.ai page we read on 17 November 2026, and we have no audience figures. This workflow makes the two key frames with your car: the toy on the ledge, then the real one at the tunnel exit.
These are two still images. On makeviral.ai the template gives a 10-second video; here you get the start and the end, and you can connect a Video node to animate the move between them, which we haven't tested on this demo. The model, Nano Banana 2.1, keeps the car's shape and its overall colour. It doesn't keep everything. The toy comes out newer than the real car: brighter blue, no scratches, simplified wheels, and a small oval on the grille that the prompt ruled out. At the tunnel exit, the paint is a little darker and the bumper scratches nearly vanish. The first attempt at that render also had a plate with made-up characters, so we reran it with a blank white plate.
For a small model scene with its own setting, see the miniature diorama, and for a person instead of a car, the photo to figurine. If you want to change the car itself, there's the car tuning simulator and the car colour changer. Both renders cost 14 credits, see pricing.
These are the files of the workflow above, exactly as the models produced them, unretouched. The starting point is shown when there is one.
Starting point
Render
Drivers and car enthusiasts who want to redo the toy car to real car transition with their own car, and reel and TikTok creators looking for the first and last frames before animating them.
A daylight photo of your car from the front three-quarter, with the whole car in the frame, plus a description of the car (model, colour, wheels, signs of wear) and the setting you want in both prompts. The photo is optional.
Photograph the car from the front three-quarter
In daylight, with the whole car in the frame. In the demo, the photo crops the left edge of the front end, and the model had to draw the missing part of the grille and the second headlight itself. A complete car leaves it less to make up.
Describe your car in both prompts
The prompts mention a dark blue three-door hatchback, silver wheel covers and scratches on the bumper. Swap in your model, its colour, its wheels and whatever sets it apart, or details from the demo may end up on your car.
Run the toy, the tunnel exit, or both
Each Image node starts from the same photo and renders a vertical 3:4 image. The toy alone or the tunnel exit alone costs 7 credits, both cost 14. The setting is yours to change in the prompt: the train, the landscape, the kind of road.
Compare with the photo, then check the plate and the grille
Look at the colour, the wheels and the wear. Then zoom in on the plate and the grille: in the demo, a first attempt carried made-up characters and the toy picked up a small oval. If a detail bothers you, spell it out and rerun only that node for 7 credits.
The same canvas, tuned for different needs: each variation is two or three lines of prompt away.
Run only the train node for 7 credits if all you want is the little car on its ledge, as a profile picture or a card to send the car's owner. The tunnel exit is only there for the transition.
Replace the train in the prompt with "a bus window ledge", "a dashboard" or "a child's bedroom shelf". Keep the line about the size of a hand and the shallow depth of field, since that's what sets the toy's scale. Not tested.
In the demo, the toy comes out with fresh paint and no scratches. If your car's marks matter to you, remove "glossy toy paint" and add "the same worn paint and the same scratches, in miniature". This version hasn't been tested.
Describe the road you want in the second prompt: a city tunnel at night, a bridge, a car park ramp. Keep the headlights on and the dark opening behind the car if you plan to edit the transition afterwards. Not tested.
Connect both images to a Video node, the toy as the first frame and the tunnel exit as the last, to get the animated transition. We haven't tested this step for this demo: expect extra credits and a result you'll have to judge for yourself.
Switch the node to Nano Banana Pro for a larger image, where the toy's small details, like the hubcap design, should hold up better. It costs more per render and hasn't been tested on this demo, which runs on Nano Banana 2.1.
The car never drove on that mountain road, and in the demo it comes out with fewer scratches than in the photo. In a for-sale listing, stick to real photos: to tidy those up, there's the listing photo.
Use a photo of your own car, or get the owner's agreement before you post. A car is recognisable, by its plate and by its details, and its owner may not want to see it going round social media.
The model can write characters it made up on the plate, and put an emblem on the grille. In the demo, the tunnel exit had to be redone because of the plate, and the toy still has a small oval. Zoom in on both before you post.
Whatever the photo doesn't show, the model makes up. The demo photo crops the front end, and the grille in both renders is partly a guess. Take a step back and get the whole car in.
It's optional. Without one, the model invents a car from the prompt. With yours, it carries the shape and colour into both images, and that's what makes the transition work: people have to recognise the same car before and after the tunnel.
You can. Here, both prompts are ready and wired to the same photo, and the demo shows up front what the model keeps of the car and what it changes, like the toy coming out newer than the original.
No. The template renders two still images, the opening and the end. You can connect them to a Video node to animate the move from one to the other, but we haven't tested that for this demo and can't tell you how it turns out.
14 credits, 7 per render on Nano Banana 2.1 in 1K. Rerunning a single image costs 7 credits. In the demo, the tunnel exit was redone once because of the plate, which makes one extra render.
896 x 1200 pixels, in vertical 3:4. That's enough for a post, or to use as the first and last frames of a video, not for a large print.
The prompt asks for glossy toy paint, and the model goes further: in the demo, the blue is brighter, the bumper scratches are gone and the hubcaps turned into plain pale wheels. A brand-new toy is still believable, but it's no longer quite your car.
It's a choice we made for the demo. The first attempt carried a plate with readable characters, made up by the model. We added a blank white plate with no letters or digits to the prompt, and the render we kept follows it. You can edit that line, knowing the model may then put any characters on it.
No. A render changes on every run, even with the same photo and the same prompt: the landscape, the angle and the car's details all move. Sometimes an image takes two tries, like the tunnel exit in the demo.
According to the makeviral.ai page we read on 17 November 2026, it starts with a reel posted on 19 October 2026 by a Turkish video editor, copied on TikTok the next day under the name "oyuncak araba akımı". It's our only dated source, and Imaginode has no connection with that site.
Toy car to real car AI trend: your car as a toy, then for real
Use this workflowFree account, no card required. The workflow opens pre-filled in your canvas.
 Nano Banana 2.1
 Flux Kontext
 Seedream 5 Pro