The renovation
The couple is redoing the living room and wants a stove for winter. Two pictures of the still-empty room, one cast iron, one white pellet stove, and they know which style suits the old mouldings.
A photo of your room with a black cast iron wood stove, then a white pellet stove, fire lit. Pick a style before the quote. Workflow visible here, no account needed.
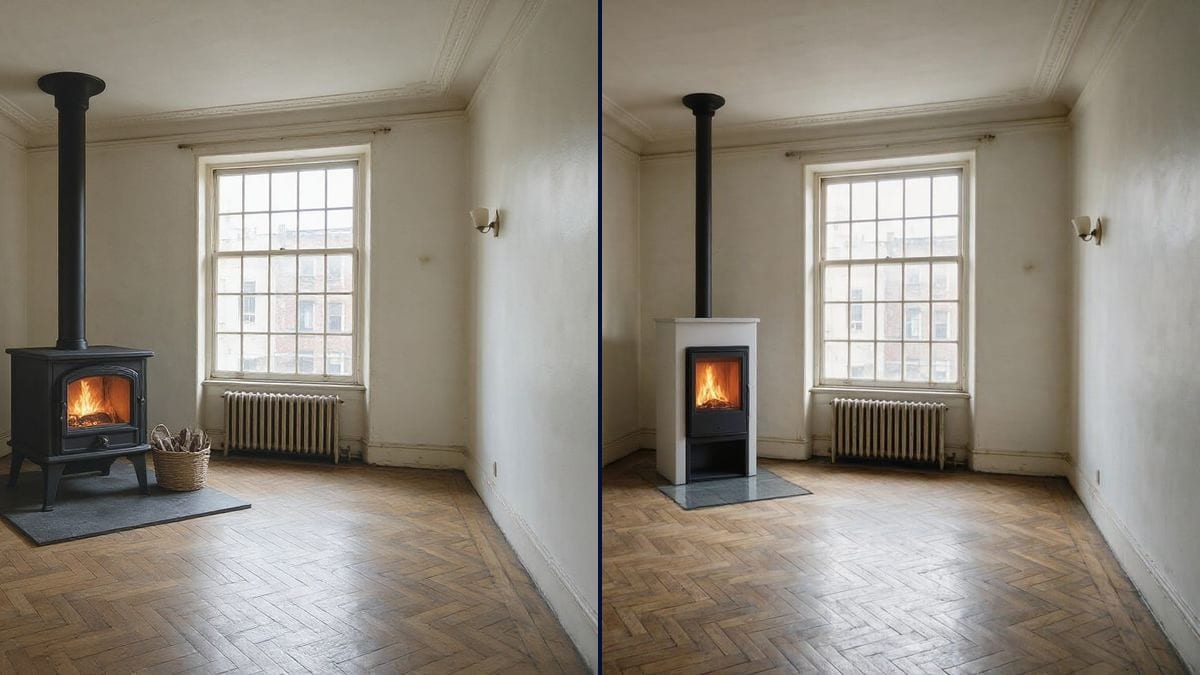
Real workflow: an empty room with white walls and herringbone parquet, then the same room with a black cast iron stove on a slate hearth, flue up to the ceiling and a log basket, and with a white pellet stove. Fire lit behind the glass in both.
At a glance
Before putting in a stove, the main question is whether it will swamp the room. Catalogues show stoves in timber cabins, hardly ever in a flat with cornices and tall windows. This workflow starts from a photo of YOUR room and adds two appliances: a black cast iron log burner with its basket of logs, then a slimmer white pellet stove.
The hard part is making the stove look installed. An image model left alone puts it in the middle of the floor, with no hearth plate and a flue that leads nowhere. The prompt sets the plate, the wall and the flue route. Flux Kontext adds the stove and leaves the rest alone; the demo also shows what it didn't follow.
To furnish the room around it, follow up with the empty room furnisher; to pick the wall colour behind it, with the paint colour test. Both stoves cost twelve credits.
These are the files of the workflow above, exactly as the models produced them, unretouched. The starting point is shown when there is one.
Starting point
Render
People weighing up a stove, stove fitters showing a model in place, holiday rental owners.
A photo of the room with the chosen wall, the floor and the ceiling, the type of stove and the flue route.
Photograph the room
The wall where the stove would go clearly in view, with the floor and ceiling in frame: the flue is judged over the full height.
Pick the type
Logs or pellets, black cast iron or white steel, big window or small. Each choice changes the look: give the colour and the size of the glass.
Place the stove and the flue
Place it relative to what's in the photo (between the door and the window), name the hearth plate and the flue route: up to the ceiling, or into the wall behind. In the demo the pellet stove's position and flue weren't followed, so run it again if needed.
Show the picture to an installer
They'll tell you whether the spot works, where the real flue can go and how much clearance to leave from walls and furniture.
The same canvas, tuned for different needs: each variation is two or three lines of prompt away.
The couple is redoing the living room and wants a stove for winter. Two pictures of the still-empty room, one cast iron, one white pellet stove, and they know which style suits the old mouldings.
The installer photographs the living room during the survey and shows the customer two stoves from the range in place. The conversation moves quickly on to the flue and the position.
The owner of a mountain rental wants a wood burner for the winter listing. He compares two models on the living room photo before ordering one, since the stove will be the first thing guests see.
He loves a real log fire but dreads hauling wood. Seeing both appliances in the same room helps him decide on looks first, before weighing up daily use with a professional.
Would a pellet stove with a flue through the wall fit in a period living room? The picture gives the look; the building's rules and the installer say what's actually allowed.
The shop invites customers to send a photo of their room and sends back the chosen model in place, to cut down on returns of a heavy appliance that is expensive to ship.
A stove with no visible flue doesn't look like anything real. Say where it goes: up to the ceiling, into the wall, up an existing chimney.
On a wooden floor, a stove sits on a protective plate. Without it in the prompt, the model stands the appliance straight on the boards.
In the demo, the stoves asked for in the middle of the left wall landed against the back wall, near the corner. Check where it ends up and run it again if the position matters.
Clearances, flue exit and air supply are decided with a professional. The picture helps you choose a model, not sign off a position.
No: same walls, same window, same radiator, same floor. Only the stove is added, with its plate, its flue and, for the log burner, a basket of logs.
Yes: ask for an insert or a stove standing in front of the hearth, with the flue going up the chimney. Describe the fireplace so it stays the same.
No. Output depends on the room volume, the insulation and the climate, and a professional works it out. The picture is for choosing the look.
Twelve credits, six per render on Flux Kontext. A third stove on the same photo costs six more.
Because it adds an object to a photo without repainting the room: the window, the cast iron radiator and the herringbone floor stayed identical on both renders.
Yes in the demo: an orange flame behind the glass in both stoves. For an unlit stove, write "stove not lit, dark glass".
Not in the demo: it rises towards the ceiling like the wood stove's, though the prompt asked for a short pipe into the wall behind. Run the render again; the installer will tell you where it can actually go.
The format of your photo, here 4:3. A whole room photographs well in landscape, from the corner opposite the future stove.
Visualize a wood stove in your room with AI
Use this workflowFree account, no card required. The workflow opens pre-filled in your canvas.
 Flux Kontext
 Nano Banana 2.1
 GPT Image 2.5 Sunburst