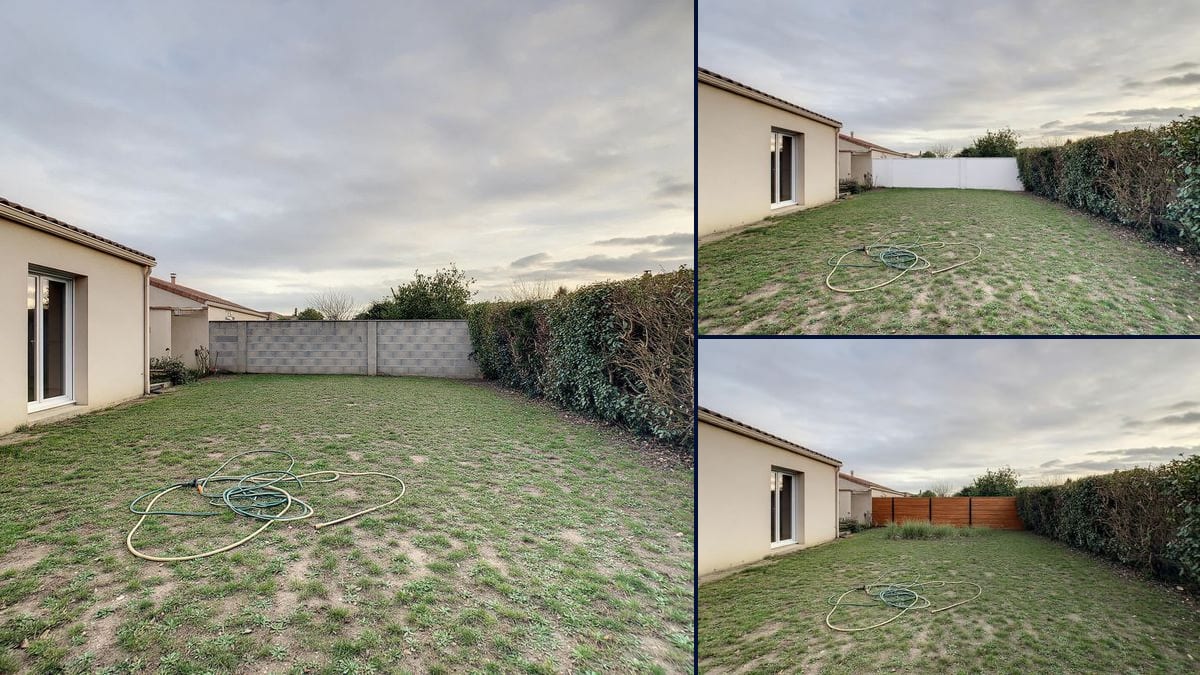
The new build left bare
The house is new, the boundary wall too, and nobody rendered it. The couple compare render and timber on a photo taken from the patio doors, before spending anything.
A photo of your garden with the block wall rendered in off-white, then clad in timber slats. To pick a finish before the quote. Workflow visible here, no account needed.
Real workflow: a suburban back garden closed off by a bare grey block wall, then the same garden with the wall rendered in off-white, and with horizontal timber cladding between black posts and a strip of grasses along the foot.
At a glance
The block garden wall goes up with the house, and everyone says they'll render it later. Years on it's still grey, and it's the first thing you see through the patio doors. Before you call a plasterer or buy a pile of timber, this workflow takes a photo of YOUR garden and shows you the same wall rendered, then clad in wood.
The hard part is touching the wall without touching anything else. The prompt names the back wall, keeps its height and length, and lists what stays put: the house, the hedge, the lawn, right down to the garden hose. Flux Kontext sticks to that well. On the wall itself it takes liberties with the pillars, and the demo shows them as they came out.
For the rest of the garden, see the garden design tool and the pergola; for the entrance, the gate; for the evenings, outdoor lighting. Both finishes cost twelve credits.
These are the files of the workflow above, exactly as the models produced them, unretouched. The starting point is shown when there is one.
Starting point
Render
Homeowners with a garden closed off by a bare block wall, plasterers, fencing installers and landscapers showing a finish on site.
A photo of the garden taken from the house with the whole wall in frame, the finish you want, its colour, and what must stay as it is.
Get the whole wall in frame
From the house, with both ends of the wall and its pillars in the picture. If the frame cuts the wall off, the cladding stops wherever the model feels like.
Name the wall to change
"The block wall at the back", not just "the wall", or the house front may change too. Then list what stays as it is.
Describe the finish
For render, the colour and texture, smooth or scraped. For timber, the direction of the slats, the tone and the posts. And what sits along the top.
Check it against the photo
Look at the pillars, the top of the wall and both ends. If something has gone missing and it matters to you, write it in and run it again.
The same canvas, tuned for different needs: each variation is two or three lines of prompt away.
The house is new, the boundary wall too, and nobody rendered it. The couple compare render and timber on a photo taken from the patio doors, before spending anything.
At the site visit, the plasterer photographs the wall and comes back with a picture of the finished render. The client sees it in their own garden, with their hedge and their lawn.
She wants it white, he wants wood. Two pictures of the same wall, from the same spot, settle it faster than an evening flicking through brochures.
It's a party wall and the work gets done together. Showing the neighbour the picture, colour and coping included, helps you agree before anyone signs a quote.
The garden is fine, the grey wall less so. Before making an offer, the buyer takes a photo of the end of the garden and looks at what a rendered or clad wall would do.
The landscaper suggests a strip of grasses in front of timber cladding. On the picture, the client sees the wall and the planting together and decides whether to keep the lawn right up to it.
The model doesn't know which one, and the front of the house can change with it. Name the back wall, and list the house, the hedge and the lawn among what stays.
In the demo, the render nearly erased them and the timber swapped them for three black posts. If your pillars need to stay visible, put it in the prompt.
The white in the render depends on the light in your photo, and the timber comes out brand new, while untreated wood turns grey over the years. Choose from a real sample.
Depending on where you live, local planning rules can say what a boundary wall must look like, down to the material or colour. The picture helps you choose; check the rules with your council.
Not in the demo: the house, the hedge, the patchy lawn and the garden hose are the same in both renders. Only the back wall changed.
Yes: swap the finish in the prompt, "dry stone cladding", "open slatted timber screen", "painted sage green". The end of the prompt stays the same.
Write "covered in ivy" or "with star jasmine trained along wires". The render shows a covered wall, which in real life takes several growing seasons.
Twelve credits, six per render on Flux Kontext. A third version, stone cladding for instance, costs six more.
Because it edits part of the photo and keeps the rest: in the demo, the house, the hedge and the garden hose didn't move. It takes liberties with the detail of the wall, so compare it with the original.
In the demo, the render swallowed them: only two faint vertical lines are left, and the stone coping is barely visible. The timber version replaced them with three black posts. To keep them, write "keeping both pillars visible".
Render gives a clean wall that matches the house; timber warms up the end of the garden but needs looking after. The picture shows the look, not how it ages.
The format of your photo, here 4:3, 1184 x 880 in the demo. A garden is best shot in landscape, from the house.
Cover a breeze block garden wall with AI
Use this workflowFree account, no card required. The workflow opens pre-filled in your canvas.
 Flux Kontext
 Nano Banana 2.1
 GPT Image 2.5 Sunburst