Sunlight eye portrait AI, made from your own photo
Your portrait in the dark with one strip of sunlight across the eyes: a golden version and a black and white one. 38 credits for both, demo flaws shown.
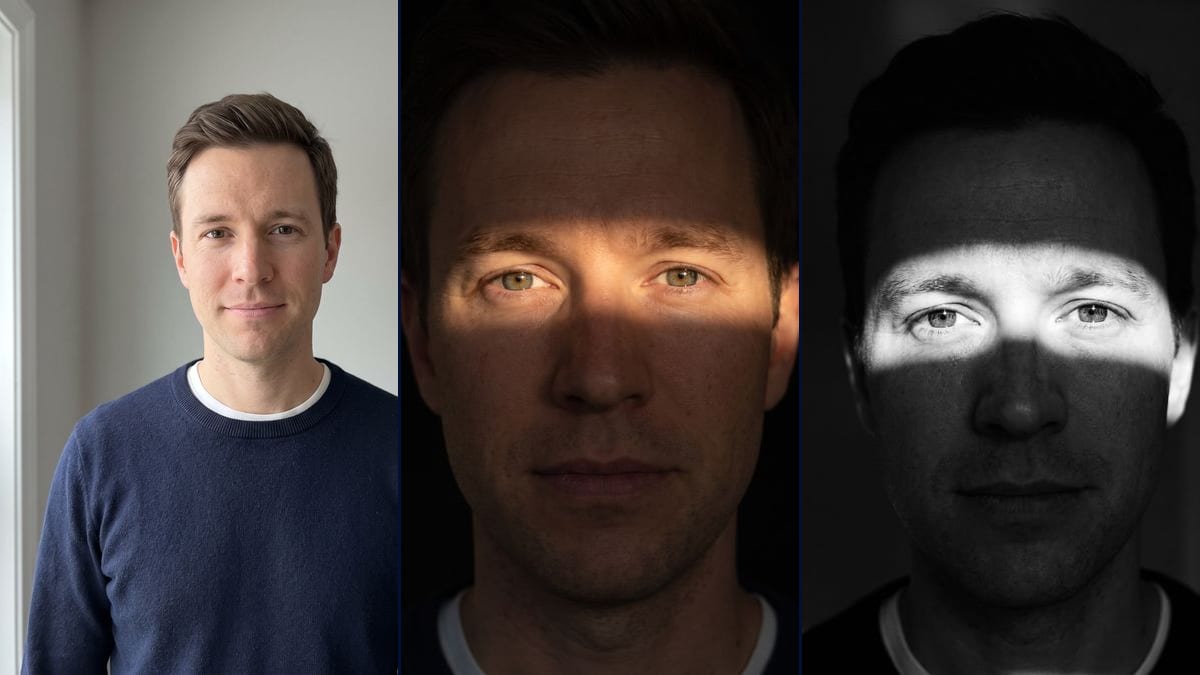
Real workflow: a clean-shaven man in a navy sweater against a light grey wall, then his face in close-up in the dark with a strip of golden sunlight across both eyes, and the same picture in black and white with a harder strip. In the golden version the irises came out greener than in the photo and light stubble appeared, two things the prompt ruled out.
At a glance
You provide
1 photo · a text or a brief
What the workflow produces
2 images in 3:4
Canvas structure
6 nodes wired by 4 connections
Models wired in
Nano Banana Pro
Cost of one full run
about 38 credits, roughly $0.46
Account
The demo is visible without an account; generating requires a free account, trial credits included
The "Sunlight Eye Portrait AI" is a very dark portrait: the face is almost black, and a single horizontal strip of golden sunlight falls across both eyes, the way light comes in through a gap in the curtains. According to the viralvideoai.app guide, updated on 17 November 2026, the image prompt was posted on X on 28 June 2026, a TikTok slideshow followed on 6 November, and tutorials started on 15 November. The guide says itself that not all of its dates are verified, and we have read no other dated source.
The trend started as a still image, and that is what this template gives you: upload a portrait, get two close-ups back. The first is in colour, with a warm late-afternoon strip. The second is in contrasty black and white, with harder light and film grain. On the demo the strip lands on both eyes in both renders, and both were kept on the first try. That does not make them faithful. In the golden version the dark eyes from the photo turned green hazel, and a clean-shaven man grew light stubble.
These are the files of the workflow above, exactly as the models produced them, unretouched. The starting point is shown when there is one.
Starting point
Your portrait
Render
The same man's face in extreme close-up on a black background, front-facing and almost entirely in shadow, with a horizontal strip of golden sunlight from the eyebrows to the top of the cheeks lighting both eyes; the irises came out green hazel with an amber centre, lighter than the dark eyes in the photo, light stubble appeared although the prompt ruled it out, the lower edge of the strip curves around the nose, the forehead stays readable and the collar of the white T-shirt shows at the bottomGenerated with Nano Banana ProThe same close-up in contrasty black and white with film grain: a harder, crisper strip of light over the eyes and eyebrows, a catchlight in each eye, the rest of the face very dark; the top edge of the strip is rounded, the ear on the right of the picture catches the light too, the white collar shows, the background is a very dark grey rather than black and a shadow of stubble shows around the mouthGenerated with Nano Banana Pro
Who it is for
People who want to try the sunlight eye portrait trend on their own portrait, for a profile picture, a post or a print, without curtains or late-afternoon sun to hand.
Which files to provide
A sharp portrait of you or of someone who agrees, front-facing, already tight, taken in daylight, both eyes open, no glasses and no hair across the eyes, plus the right person, their clothes and their eye colour in the prompts. The photo is optional.
How it works
1
Upload a front-facing portrait that is already tight
Sharp, taken in daylight, both eyes open, no glasses and no hair across the eyes. The demo starts from a head-and-shoulders portrait, so the model had to enlarge the face, and part of the skin texture, lashes and irises is made up.
2
Fit the prompt to the person
Both prompts say "the man in this photo", "his navy sweater" and "short hair", which describe the demo. Put in the right person, their clothes and their hair, and change the pronouns if needed. The strip, the black background and the sentence about the face can stay.
3
Write down your eye colour
The prompt says not to change the eye colour, and the golden render on the demo changed it anyway. If your eyes drift, name the colour after "the same eyes and iris colour", for example "dark brown eyes". We have not tested that fix.
4
Compare at full size, then rerun one render
Zoom in and check the eyes, the skin and the outline of the face next to your photo. If one render does not look like you, rerun only that one for 19 credits. Every run places the strip a little differently.
Variations and use cases
The same canvas, tuned for different needs: each variation is two or three lines of prompt away.
A version for a woman
Replace "the man in this photo" with "the woman in this photo" in both prompts, change the pronouns, describe her hair instead of "short hair" and take out "do not add a beard". Add "no heavy makeup" if you do not want invented makeup. Not tested.
A vertical strip
Replace "one narrow horizontal strip" with "one narrow vertical strip" and say it runs down over one eye only, from forehead to chin. Remove the sentence asking for a level strip. The face then splits into a lit half and a dark half. Not tested.
Window blind light, in several stripes
Instead of a single strip, ask for "several thin parallel strips of sunlight, as if through window blinds", one of them across the eyes. With several stripes more of the face shows and the picture is less dark than the demo. Not tested.
One eye only, three-quarter view
Upload a three-quarter portrait and write that the strip touches only the eye nearest the camera, with the other left in shadow. Replace "straight on" with "three-quarter view", or the model will turn the face back to the front. Not tested.
Square, for a profile picture
Switch the node from 3:4 to 1:1 before you run it. A round avatar cuts off the top of the hair and the chin, so ask for a frame that stops at the forehead and the mouth, with the strip in the middle. Not tested.
Your dog or your cat
Replace "the man in this photo" with "the dog in this photo" and the sentence about the face with a description of the coat and the eyes. Take out the sweater, the beard and the celebrity lines. On a long muzzle the strip may not lie flat. Not tested.
Common mistakes
Starting from a head-and-shoulders portrait
The demo does, and that explains part of what went wrong. The model tightens the frame onto the face and has to draw pores, lashes and irises the photo does not show at that size. With a portrait that is already tight, it has less to invent.
Trusting "do not change the colour of his eyes"
The golden prompt says it twice and the irises still came out greener than in the photo. Forbidding a change does not tell the model the right colour. Spell yours out and compare the render with your photo before you post it.
Leaving "the man" and "navy sweater" in for someone else
Those words describe the man on the demo. With a photo of a woman in a white shirt, the model gets two descriptions that contradict each other and may masculinise the face or swap the clothes. Fix the person, the pronouns and the outfit before you generate.
Expecting a truly black face and a ruler-straight strip
On the demo the forehead stays readable in the golden version, the lower edge of the strip curves around the nose, the white collar shows, and in black and white one ear catches the light. The prompt asks for a narrow strip with clean edges. The model renders real light, and real light spills a little.
Not necessarily. On the demo, the dark eyes in the photo came out green hazel with an amber centre in the golden version. Sunlight does lighten an iris, but here the model also invented the detail, because the starting photo is framed head and shoulders. Start from a tighter portrait and check the render.
Do I need a photo taken in the sun or in a dark room?
No, the opposite works better. The demo starts from a portrait in soft light against a light grey wall. The model builds the shadow and the strip of sun. It needs a sharp, well-lit face so it has features to copy.
Why does the man on the demo have stubble?
The model added it. The man in the photo is clean-shaven and the prompt says "do not add a beard". It shows in both renders, more so in the golden one. We kept the pictures as they came out so you can see it.
How much do the two images cost?
38 credits, 19 per render on Nano Banana Pro at 2K. Both demo renders were kept on the first try. If one of yours does not work, rerun just that one for 19 credits.
Can I pay less?
Yes, by switching the node to Nano Banana 2.1 at 1K, which costs less per render and gives smaller pictures. We did not test it on this template, and the eye detail is the part most likely to suffer. The demo runs on Nano Banana Pro.
How big are the images?
1792 x 2400 pixels, portrait, in a 3:4 ratio. Enough for a story, an Instagram post or a print of about 15 x 20 cm.
Do I get a video?
No, two still images. The trend started as a picture, and the site we cite offers an animated version with a blink and a slight camera move. You can plug a Video node in after the image in the canvas. We have not tested that on this template.
Where does the sunlight eye portrait trend come from?
We do not know who started it. The viralvideoai.app guide, updated on 17 November 2026, mentions an image prompt posted on X on 28 June 2026, a TikTok slideshow on 6 November and tutorials from 15 November. It says not all of its dates are verified. It is our only dated source, and Imaginode has no link with that site.
Do I have to provide a photo?
The photo is optional in the canvas, but without it the model invents a face. For the eyes in the strip of light to be yours, it needs your portrait.
Does the strip always land on the eyes?
On the demo it did, in both renders, first try. We only tested a front-facing portrait with the head upright. With a tilted head or a face in profile the strip may fall on the forehead or the cheek: rerun it, or straighten the photo before you upload.
Sunlight eye portrait AI, made from your own photo
 Nano Banana Pro
 Flux Kontext
 Seedream 5 Pro