Preparing a short film
The director and the cinematographer compare two approaches on a photo of the real set, and arrive on set with a lighting direction already decided instead of deciding there.
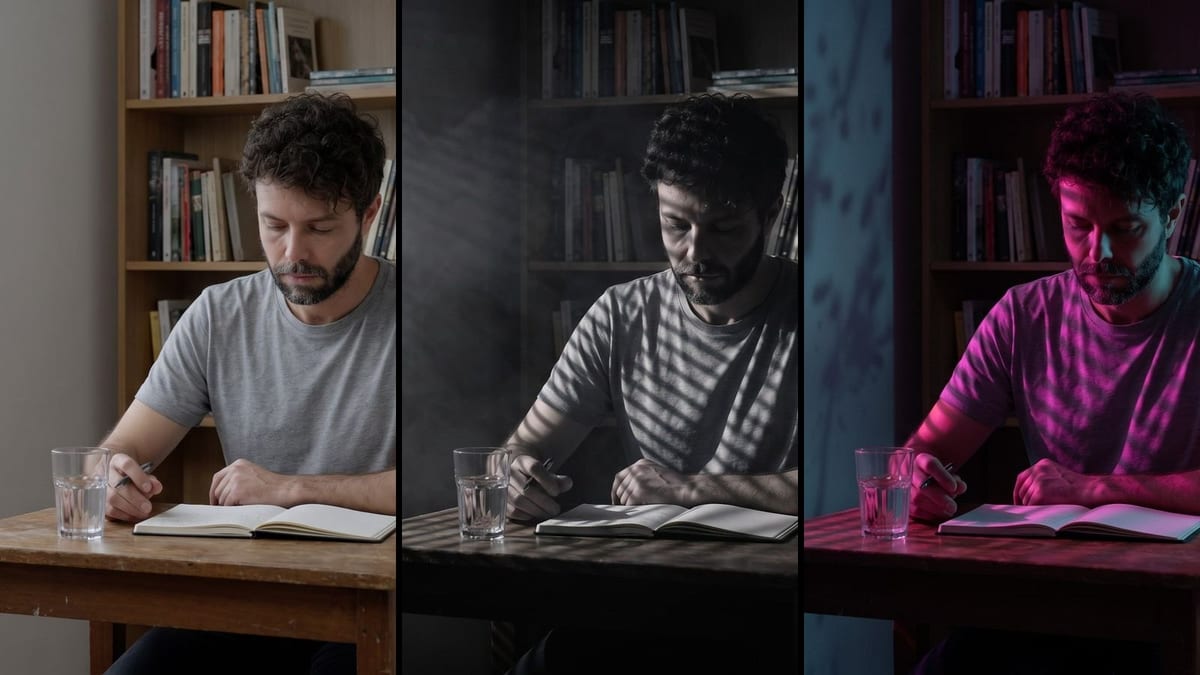
A flatly lit shot becomes two lighting proposals, film noir and neon night, without moving the set or the actor. Workflow visible here, no account needed.
Real workflow: a flatly lit rehearsal frame, then the same shot as film noir through blinds and as a neon night in the rain. Same framing, pose and objects, only the light changes.
At a glance
Before filming, a cinematographer tries lights: where the source comes from, hard or soft, warm or cold. On set, every test costs an hour of electricians. This workflow does it on a plain rehearsal photo: the same shot comes back as film noir, then as a neon night.
The hard part is changing ONLY the light. An image model that relights happily redoes the set or the framing, and you are no longer comparing two lights but two photos. Both prompts therefore lock framing, pose and objects, and only describe the sources, their direction and their colour.
The starting shot is flatly lit, like a rehearsal frame: it is the most neutral canvas. The test sits next to location scouting and the mood board. The two lights cost thirty-eight credits.
These are the files of the workflow above, exactly as the models produced them, unretouched. The starting point is shown when there is one.
Starting point
Render
Directors, cinematographers, photographers and film students who want to compare lighting choices before filming.
A flatly lit photo of the shot, with no strong shadows, plus a description of the light sources to try.
Start from a flatly lit shot
A rehearsal photo, a scouting grab, a phone shot in daylight: with no strong shadows, the model has a neutral canvas to relight.
Lock everything but the light
Same framing, same pose, same objects, spelled out in each prompt. Without that sentence the model moves a lamp or changes the shirt, and the comparison no longer holds.
Describe sources, not mood
"Hard light through the blinds from the left" gives a result; "mysterious mood" leaves the model guessing. Direction, hardness, colour, one source per sentence.
Say where the light does not go
Rain outside and not in the room, smoke behind and not in front of the face. Measured on the demo: without that detail, the rain fell indoors.
The same canvas, tuned for different needs: each variation is two or three lines of prompt away.
The director and the cinematographer compare two approaches on a photo of the real set, and arrive on set with a lighting direction already decided instead of deciding there.
The same set in three moods, neon, daylight, smoky backlight, to pick the one that suits the track before booking the studio.
Two relit images in a funding application show the film's look far better than a paragraph about light: the panel sees what it is going to fund.
A teacher shows what a hard source, a backlight or a colour changes, on exactly the same shot, which a stock photo library never allows.
A product on a table, tested in morning light and evening light, to pick the mood of a campaign before paying for a shoot.
A key room of the story tested at several times of day, to keep the lighting consistent across episodes or levels.
Without the sentence that locks framing, pose and objects, the relight moves the character or changes the set. You then compare two different photos, not two lights.
"Anxious mood" does not say where the light comes from. A source, its direction, its hardness, its colour: what a cinematographer would set.
A shot with a strong backlight or hard shadows keeps its shadows under the new light. A flatly lit shot relights far more cleanly.
Rain, smoke, reflections: say where they must not go. On the demo, the rain first fell inside the room, in front of the face.
Yes, one more Image node per test, each wired to the same shot: golden hour, moonlight, screen glow. Each test costs nineteen credits.
As a discussion tool with the crew, yes: you agree on a direction before renting gear. It is not a lighting plot, which remains the gaffer's job.
The workflow relights an image. For a video, test the light on a frame grabbed from the shot, then apply the chosen direction on set or in the grade.
Thirty-eight credits for both lights, nineteen per image on Nano Banana Pro. One more test on the same shot costs nineteen credits.
Because it reproduces a reference image while keeping its structure, framing, character and objects, as measured on location scouting and scene coverage.
On the demo, same face, same pose, same shirt in all three images. Still check the details, an object can slide on a table.
The format of the starting shot, 16:9 in 2K here. A vertical shot is tested by setting both nodes to 9:16.
For private study the question arises; for publication, no. Start from a photo you took, your own set serves the preparation better.
Test the lighting of a shot with AI before filming
Use this workflowFree account, no card required. The workflow opens pre-filled in your canvas.
 Nano Banana Pro
 GPT Image 2.5 Flare
 Seedream 5 Pro